TRYKIT 2WD (Two Wheel Drive) CONVERSION SET


Trial assembly of the Trykit Two Wheel Drive system and journal bearings on the new axles.
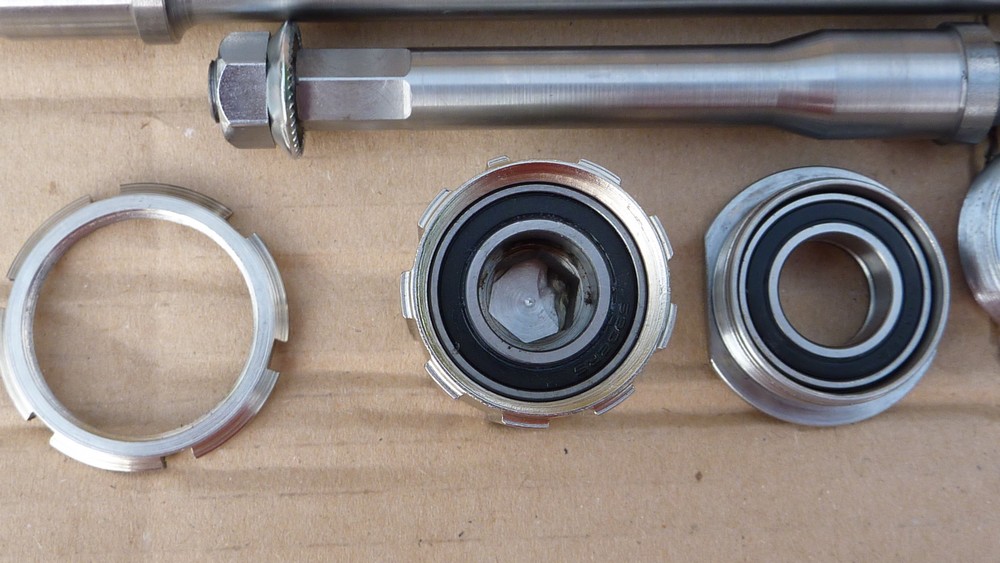
Whoops! Experts will notice I have fitted the Trykit 2WD freehub back to front in this mock-up arrangement for the photograph. The locking ring should go behind the sprocket block/cassette.Not in front. In use, the upper axle in this image fits in the other side of the Trykit double ratchet, freehub body.
_________________________________________________________
The combination of riding on the "wrong" side of the road (compared with the UK) and regular axle rebuilds was leaving something to be desired. On steep climbs the front wheel would go light on every pedal stroke and then jerk hard to the right on opposite lock. This was exacerbated by holding the handlebars at the centre. Leaning forwards onto the brake hoods helped but was certainly not ideal for my breathing.
Experimentally moving over to the left side of the road (on quiet lanes when there was no traffic) immediately neutralised this bad behaviour. The problem is that one can only rarely ride on the left with any degree of safety in Denmark. It is expected that even a (slightly eccentric) English tricyclist rides on the correct (right) side of the road.
The original Higgins axle cones were showing signs of wear and required ever more regular dismantling and greasing to keep the axle quiet. The embarrassment of passing another cyclist with the axle clonking like an old-fashioned, clothes wringer was really getting on my nerves. I could have ordered some new axle cones from Chris Hewitt but I liked the wonderful silence and lack of maintenance of my Longstaff trike conversion.
So, after months of worrying about the considerable expenditure, I finally ordered a Trykit 2WD system. Which I would fit myself as a compete, made to measure "kit". Normally Geoff Booker of Trykit would like to have the trike in his workshop. So that he could measure up accurately, make the parts to fit perfectly and then assemble them on the trike for the customer. I couldn't afford the cost of two way international transport for my trike. I also had the tools and skills to measure my Higgins accurately in the first place and then fit the device myself. Thankfully Geoff agreed to supply his 2WD system on this basis.
Apart from the special, double-freewheel, freehub body the DIY kit would include new axles and sealed journal bearings. The latter would be fitted into modified, bottom bracket, bearing cups. Lightweight alloy bearing cups were offered but I opted for the much cheaper, modified, secondhand bearing cups. While I do like the idea of a lightweight machine, the difference in weight between steel and alloy cups is hardly likely to matter to me. Not when compared with my huge shopping bag and "covers all risks" tool kit. I haven't weighed it but let's assume 5lbs minimum on every trip even before the shopping is stuffed in there.
I use shopping trips to many different supermarkets as my goals for each daily ride. In Denmark most large, rural villages have at least one supermarket. Often more than one. This gives me quite a large choice of shops and routes within a fifteen mile radius to avoid my routes becoming stale. Fortunately I enjoy beautiful, rural countryside and quiet lanes to all of these shops in all directions.
-------------------------------------------------------------------------
Preparation and Assembly of the Trykit 2WD system:
The big shopping bag was removed from the Higgins. The wheels loosened and then the trike was lifted onto my cheap but excellent (£20) Lidl work stand at full height. I might as well be comfortable while finding my way around my first attempt at fitting the 2WD system. Lifting the trike onto the work stand without the heavy bag in place is really no problem at all.

The Higgins stripped of its axles and bearings rides high on the work stand. I should have tied the chain to the rear loop as well as the top to keep it well out of the way. I also removed the rear gear changer and hanger after I took this picture.

Oh, the excitement! The Trykit package has finally arrived! I was (almost) tempted to do an "unpacking" video. Like the sort of thing they enjoy on YouTube. I'm afraid you'll have to make do with a few still images instead. ;-)
BTW: Trykit is Geoff Booker. He works alone, with the help of his wife. So delivery times are flexible depending on his workload and his (local and international) trike racing activities. In my case it took about a month from placing my order. This seems very reasonable considering that two precision axles had to be made to fit my trike exactly. (Trike axle width, or track, varies considerably so no two axles are likely to be identical) No doubt an order for a Trykit trike has higher priority than a "humble" 2WD system. I'm really not sure. The chap has to eat as well as keep the world of international triking rolling along nicely.

The teaser shot! Nicely wrapped considering all the hidden components are tough steel.

The Higgins 2WD kit in all its glory!
Beautifully machined with nicely waisted axles to save a fair bit of weight. This also provides a little flexibility and arguably greater strength in use. A stiffer axle would merely push the greatest loads out to the short distance between the outer bearings and the hubs. A slightly more flexible axle would help to take some of the road shocks from the wheels. Dissipating it safely in the much greater axle length between the bearings where the axle is much more lightly loaded. The axle can be thought of as a lever with a fulcrum at the outer bearing. The ratio between the short length of axle beyond the bearing and hub relative to the length to the inner bearing gives some idea of the local loads involved. The axle must resist the weight of the rider and any road shocks applied through the wheel. The majority of the bending forces occur in the short distance between the outer axle bearing and the inner side of the wheel hub.
My Higgins has a single, fixed, bottom bracket cup behind the cassette. So one was provided in the "kit" already fitted with its journal bearing. Many more Higgins trikes have an adjustable bearing cup behind the sprocket block instead. In the image above, the special, Trykit, double-freewheel, "freehub" is shown on on the left with its adjustable, cassette, stop ring.
A closer view inside the Trykit 2WD body. With central blanking plate and the pawl carriers with hex-shaped cut-outs to match the inner axle ends. Note the way the axle extends at the full 17mm diameter right out to the conical section which fits the matching female cone of the Higgins hub. The parallel section, to the left of the conical section, is actually hidden within the wheel hub.
Inside the special, Trykit, 2WD freehub there are two pairs of pawl carriers. With three pawls each per independent axle drive. Six pawls in total per axle. The large female thread just inside the body is for the standard, male Shimano Cassette locking ring. This ring also holds the top gear sprocket(s) in place as it clicks down tight using the special splined tool. These parts are typical freehub mechanics and safely avoids unique engineering principles. With possible catastrophic redundancy if the parts became suddenly unavailable.
Geoff is to be highly commended for his common sense in his 2WD design. Bicycle free-hubs are in universal use on racing and mountain bikes. So are likely to remain in use for many years to come. So matching multi-sprocket (Shimano standard) cassettes and locking rings, and their fitting tools, are all likely to remain available for decades.

Just look at the sheer quality of machining of the Trykit double freewheel body!
Geoff uses spark erosion to produce the internal ratchets. The number of teeth on the ratchets has been optimised to match tooth size and longevity.
The Trykit double freewheel body internals showing the double pawls in their carriers, 27-tooth ratchets and central spacer. The central spacer is to allow the owner to safely drive out the pawls and bearings for maintenance. Spare pawls and springs are available if needed. The sealed, journal bearings are affordable, standard designs available globally.
These are likely to last a very long time because they are all safely sealed and only turn (as bearings) when free-wheeling under almost zero load. The rest of the time they merely support the freehub and cassette concentrically on the inner axle ends. While pedalling, the entire trike axle arrangement rotates as one. Road wheels, half axles, freehub, bearings, pawl carriers and the multi-sprocket cassette. Although these bearings have to resist chain loads they are easily large enough for the task. On a bicycle, a freehub bearing rotates constantly on the rear axle whether you pedal or freewheel. A normal freehub's bearings are almost pathetic compared with those used in the Trykit body.
Light grease is recommended for lubrication of the Trykit freehub body pawls. These make a very quiet but pleasant buzz when free-wheeling at walking pace. Though it has to be very quiet indeed to hear this sound. I don't freewheel much so I rarely hear anything at all from the Trykit 2WD system and its axles.
I believe this is the Mk4 version of the Shimano-fit body as Geoff finds new ways to improve his product. Shimano cassettes up to tens speeds are compatible. With a minimum of an 11 tooth, top gear sprocket allowed in the latest iteration of this very special, Trykit, double freewheel freehub.
Geoff also offers special axles to convert a Higgins trike to a 15mm bore Trykit or Longstaff hub fitting. These have larger axle dimensions than the Higgins where it really matters. Offering much greater strength at the cost of slightly increased weight. Though hollow axles can mitigate against the extra weight without much loss of strength.
I had bought new, Higgins-fit wheels from Geoff only 9 months earlier. So was in no hurry to discard them or leave then lying around unused. So I chose to continue with Higgins-fit axles. Denmark has zero demand for spare trike bits and pieces. Postage to the UK is prohibitive. So it is not easy to put anything on eBay(UK). Geoff's design for the axles easily overcame the bottle-neck in the original Higgins cone section. So I was confident the new axles would easily outlast me despite my choice of the smaller section, Higgins fit hubs and axles.

A comparison shot of the Higgins original axles and components with the Trykit parts just above. The clever Trykit 1WD freehub adaptor kit lies at bottom left. (now unused) Here, the Trykit 2WD body has been fitted into a 7-speed Shimano cassette. Now modified to a 13-28T 7 speed from an 8 speed, 11-28T by the substitution of a larger, single, top gear sprocket instead of a double. I hardly ever feel the need for a very high top gear even on the steepest descent. I would much rather have a closer ratio, 8-speed 14- 28T cassette.

The Trykit lock-ring has been snuggled up against a spacer ring behind the Shimano cassette. The Trykit 2WD body will take cassettes up to 10 speeds. My modified, 7 speed cassette found the thread just slightly too short. All it needed was a simple packing ring to take up the free play. Such spacer rings were once widely available from better bike shops for spacing bottom bracket cups.

Here I am checking the vital clearance between the inner axle ends with a 4mm Allen key. Using a round, 4mm rod or drill shank would have been slightly more accurate.
BTW: On Geoff's advice I regularly checked the freedom of the axles during assembly by rotation with my fingers. This helped to ensure there was no binding of the bearings through over-tightening of the adjustable bearing cups. A tiny amount of end play is desirable for long bearing life. Though too much end play might affect indexed gearing.
As can be easily seen in the image above: My left, axle bearing cup is non-adjustable. So the right side cup was carefully adjusted to just nip the hex key very lightly. Note that both outer axle bearings in their screw cups were fitted to ensure the axles were properly aligned for this axle spacing measurement.
The hexagonal, inner axle ends fit the twinned pawl carriers inside the 2WD body. The turned sections alongside these fit the 2WD body bearings. Which are slightly smaller bore than the axle bearings. As can be seen by the larger, parallel section on the right protruding through the axle bearing. This clearly "steps down" in diameter from the 17mm bearing bore to the 15mm cassette body bearing diameter on the right axle stub.

Trial assembly: Note the "deliberate" mistake! I forgot the locking ring on the right side adjustable bearing cup! So I had to withdraw the right side axle again to be able to fit it in place. This is not too difficult if the wheels nut is fitted to give yourself something to pull against. The outer bearing cup has to be removed first or the axle will not come out.
Once in place I watched the adjustable bearing cup carefully as I tightened the lock-ring. Just to avoid it turning and undoing my earlier 4mm measurement. If you find yourself assembling one of these 2WD axles yourself then do fit the lock-ring first. Then tighten it properly before being fully satisfied with your final 4mm measurement! You have been warned! Do as I say! Not as I do! ;-)

The right side, adjustable cup, lock-ring is now safely in place. The chain has been tied up to the upper, axle, reinforcing loop. My poor old Higgins has suffered some cosmetic damage to the paintwork over the years. If my trike was as immaculate as are many others I would have protected the reinforcing loops with taped on paper or cardboard before starting work. I treat my trike as something I ride every day at the cost of some slight loss of appearance. If I started worrying about the paintwork I'd need to fit a proper rear carrier for my huge shopping bag. Then spend hours cleaning the trike instead of adding more miles. Your mileage may vary. :-)

Ready for the road! With the Suntour ARX, rear gear changer refitted to the Trykit hanger. Followed by a quick wipe over to remove the oily fingerprints from the trike frame for the picture. Had I been more fastidious, and less impatient to try out the 2WD, I would have cleaned the cassette thoroughly before fitting it. It was now 7pm. Dinner and dusk threatened!

Note the extra clearance between the outer bearing cup and the Trykit hub. After discussion with Geoff it was decided that I could risk an extra 6mm of extension (over the usual clearance) beyond the outer axle bearings. I was hoping for a little extra width on the rear wheel track for greater lateral stability on rough roads. Plus room for a cup-adjusting spanner without removing the wheels. The diameter of the axle is 17mm where it fits through the axle bearings. This diameter is carried right through to the conical seating of the Higgins fit hubs. Unlike the Higgins originals. Which are actually stepped and reduced to two flats to take the removable cones at the most highly stressed point anywhere on the original Higgins axles!
A Longstaff axle is much beefier and could more easily accept the extra loads from spacing the wheel hub just a little further out beyond the outer bearing. The Higgins is strictly limited by the internal size of the original tubular axle casing between the bearing cups. This short, visible axle section is the most heavily loaded part of the entire machine. One cannot just keep adding axle extension without very serious risk of failure. Not even with high quality, modern steels. The axle would bend very slightly on every bump. Eventually and inevitably it would work harden the steel. Leading eventually to fatigue. Then one day it might just snap off without warning! Probably when one is many miles from home just as a heavy vehicle passes.
A broken trike axle is too awful to contemplate in traffic! It is a disaster at any time and one should check the wheel fixing nuts regularly to avoid accidents. I read about one racing tricyclist who forgot to fix the wheel nuts on his trike just before a race. He had severe injuries when the wheels literally fell off! It's a long way down when you suddenly lose over a foot of axle height between you and the vicious tarmac!
After reading about trike axle breakage online I must admit to having had a real sense of insecurity when running about on the original 56 year-old Higgins axles. Every time I was passed by a six axle, Continental, HGV colossus I would worry about the Higgins axles. Every time I exceeded 30mph going downhill I would worry. New axles in high quality steel, without the stress-raising sharpness of the cone seatings, are a real bonus with the Trykit 2WD.
I could have bought new just a set of OWD (One Wheel Drive) axles from Geoff but chose to buy the 2WD system at the same time. I knew I'd want 2WD sooner, rather than later. Then I would have no use for two pairs of redundant, OWD axles when I finally made my mind up. Special new axles are required for the 2WD system because they must reach inside the 2WD body. They must also accept journal bearings.
I shall discuss my Trykit 2WD riding experiences in the next chapter: Which, thanks to the strange logic of reversed blog posts, is actually first. So you're probably reading this chapter long after you've read about my riding my trike with Trykit 2WD fitted.
A link to 2WD maintenance instructions on the Trykit website:
http://myweb.tiscali.co.uk/trykit/Service%20instructions%20for%20axles.htm
http://myweb.tiscali.co.uk/trykit/Service%20instructions%20for%20axles.htm
Another of my blog posts discussing 2WD maintenance one year on:
http://pedal-trikes.blogspot.com/2011/09/trykit-2wd-maintenance.html
http://pedal-trikes.blogspot.com/2011/09/trykit-2wd-maintenance.html
Later note: I discovered something much later while playing about with 10 speed indexed gears on my old Higgins: When ordering a 2WD system for an old Higgins trike Ask Geoff to design the new axles to bring the largest (bottom gear) sprocket to the centre of the reinforcing axle cage. This will allow the largest possible sprocket to be fitted, if desired, when using a 9 or 10 speed cassette. This is easily taken care of my extending the new, left axle slightly and shortening the new right side one. This will help to bring the 2WD freehub to the centre of the axle reinforcing loops. If this is not done the largest sprocket will lie too close to the reinforcing loops. Limiting the largest bottom gear sprocket to only 26T in my case. This forces the use of a smaller inner chainring to make the gear ratios low enough for climbing steep hills while maintaining a high cadence.
Click on any image for an enlargement. Back click to return to the text.
*
You are a genius. Please write when you can, I need to consult you about a special crank design I am contemplating. Thank you
ReplyDeleteGenius? Not even I believe that. ;-)
ReplyDeleteHow do I contact you when you don't leave an email address?
Chris
What was the approximate cost of the trike rear end and upgrade?
ReplyDeleteHi
ReplyDeleteI'm afraid I no longer have any idea what it cost. I also had two matching rear wheels made to order at the same time.
This was a rare case of Trykit providing a "2WD axle kit" anyway. Geoff Booker [Trykit] prefers to have the machine in his own workshop. Perfect axle housing alignment is crucial to 2WD and often lacking.[Or so I am told] Geoff has the skill and equipment to re-align a poor trike rear end.
As I was in Denmark it would have been prohibitively expensive to freight the trike both ways for fitting. Perhaps the free "exposure" on my blog helped to persuade Geoff to help in my [very unusual] case?
You'd have to contact Geoff direct if you have similar hopes. I have no idea if he still supplies "loose" parts to order. Check his website for details.
Chris